Chimney flashing is an essential part of your roofing system, protecting your home from water damage by acting as a shield between the chimney and the roof. It prevents water from leaking into your structure, which can lead to costly repairs and even structural damage. Proper installation of chimney flashing ensures your roof and chimney last longer and stay safe.
Think about a heavy rainstorm. If your chimney flashing isn't properly installed, water could seep into your attic, causing damage to the wood and insulation. Over time, this could lead to mold, rot and even threaten your home's structural integrity.
But with well-installed components of chimney flashing: pan, step, and counter flashing, your roof and chimney will stay dry and secure, protecting your home. Let’s dive into each of these components, their roles, and how to install them properly.
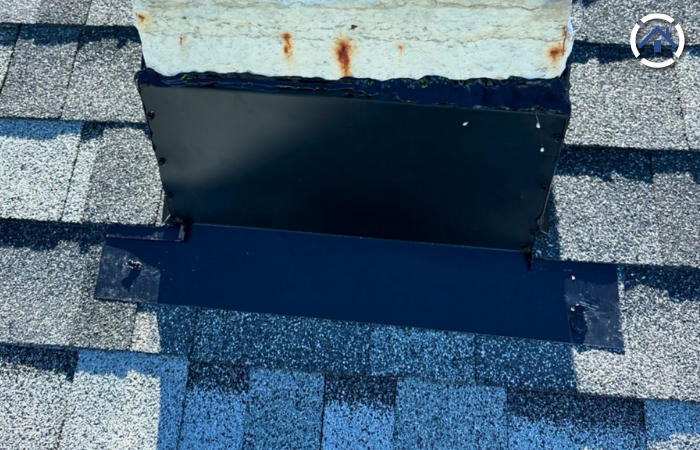
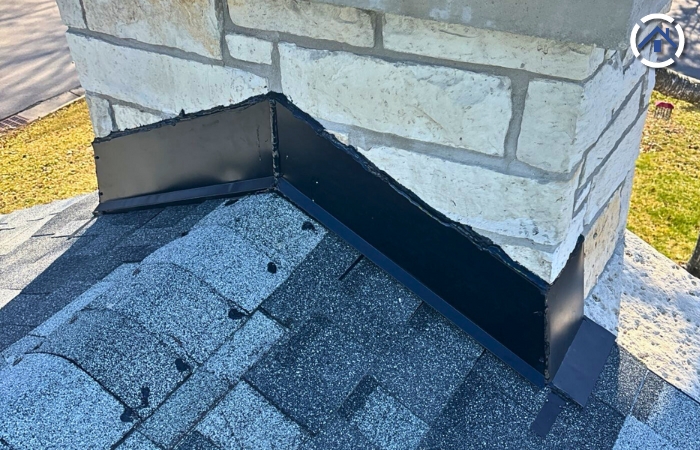
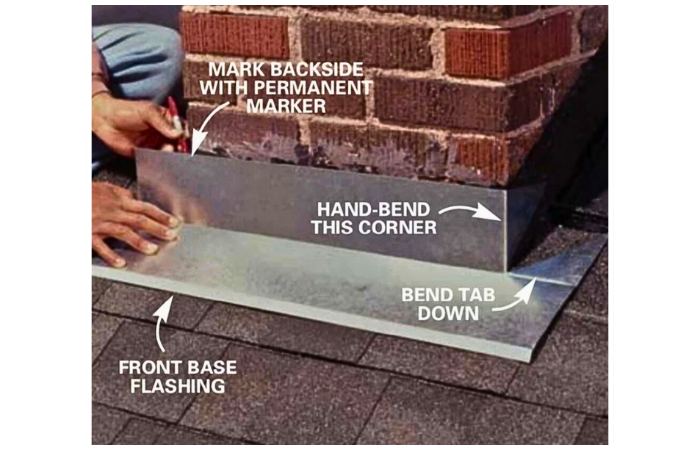
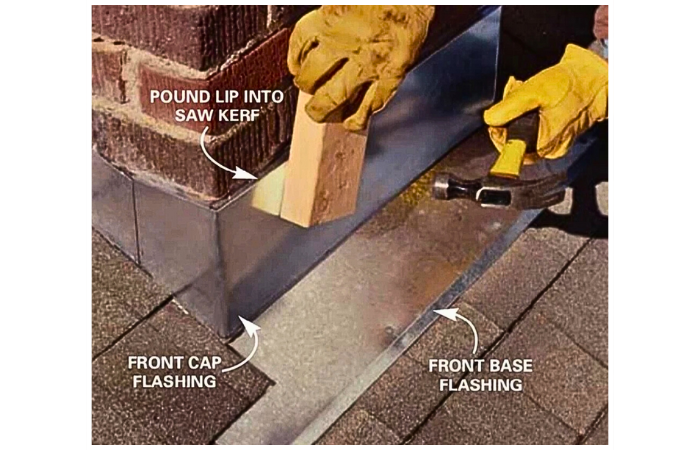
Pan flashing, also known as base flashing, is a critical element of your roofing system that serves as the first line of defense against water infiltration at the base of your chimney. It is installed around the base of the chimney, bridging the gap between the chimney and the roof. Its primary function is to direct water away from the chimney base and onto the roof, preventing moisture from seeping into the roof structure.
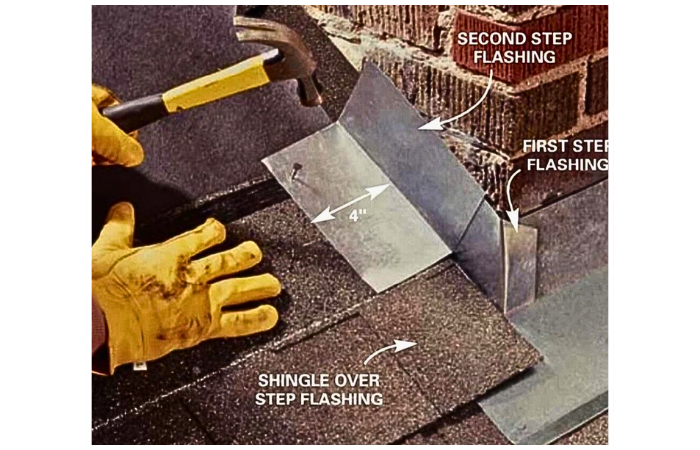
Step flashing, on the other hand, is installed along the sides of the chimney as you move upward from the base. Each piece of step flashing is interwoven with the roofing shingles, creating a step-like pattern up the chimney sides. Step flashing’s primary role is to guide water away from the roof and down the sides of the chimney, effectively channeling it away from the roof surface and reducing the risk of leaks around the chimney.
Counter flashing provides an additional layer of defense to the chimney flashing system by overlapping and covering the top edges of the pan and step flashings. This design is critical because it creates a barrier that prevents water from getting behind the lower flashings.
Correctly positioning and installing all three types of chimney flashing is crucial to make sure they function harmoniously and form a waterproof barrier. Here is how to correctly position and install each type of flashing:
Pan flashing is installed around the base of the chimney, forming a continuous barrier between it and the roof. It extends a few inches up the sides of the chimney and lies flat on the roof.
Here’s how to install pan flashing:
1. Measure and cut the pan flashing: Begin by measuring the base of the chimney to determine the appropriate size, then cut the pan flashing to fit snugly around the area.
2. Position the flashing: Slide the pan flashing underneath the roofing materials surrounding the base of the chimney, ensuring it sits flat.
3. Check the coverage: Verify that the pan flashing extends a few inches up the sides of the chimney and overlaps the surrounding roofing materials to create a watertight seal.
4. Secure the flashing: Fasten the pan flashing in place using roofing nails or screws, making sure it is firmly attached for lasting protection.
Step flashing is installed along the sides of the chimney, overlapping the pan flashing at the base. It is positioned in a step-like pattern, with each piece of step flashing interwoven with the roofing shingles.
Here’s how to install step flashing around your chimney:
1. Measure and cut the step flashing: Begin by measuring the height of the chimney and then cut pieces of step flashing to match that measurement so they fit perfectly along the chimney sides.
2. Install the first piece: Start at the base of the chimney and slide a piece of step flashing underneath the adjacent shingle while positioning it against the chimney's side.
3. Overlap with shingles: Place the next shingle on top of the step flashing, making sure it extends over the flashing by at least an inch to provide good coverage.
4. Continue up the chimney: Keep alternating shingles and step flashing as you move up the chimney sides, maintaining the overlap to create a watertight seal.
5. Secure the flashing: Use roofing nails to firmly attach each piece of step flashing to ensure they stay in place and provide ongoing protection against water damage.
Counter flashing is installed over the pan, and step flashing extends several inches into the mortar joints of the chimney. It overlaps the flashing below, creating a watertight seal.
Here’s how to install counter flashing around your chimney:
1. Measure and cut counter flashing: First, measure the length and height of the chimney so you can cut the counter flashing to fit perfectly along the chimney’s sides.
2. Create grooves in the chimney mortar: Use a suitable tool to cut shallow grooves, known as reglets, into the mortar joints of the chimney. These grooves will house the counter flashing and keep it securely in place.
3. Insert the counter flashing: Carefully slide the counter flashing into the grooves you made in the chimney mortar. Make sure it overlaps the pan and step flashing, providing a seamless protective layer.
4. Fasten the counter flashing: Attach the counter flashing securely using masonry screws or a strong sealant to keep it in position and provide a tight seal against water intrusion.
5. Double-check the coverage: Finally, confirm that the counter flashing extends beyond the step flashing and covers any exposed top edges for comprehensive protection from water.
Knowledge about the three main components of chimney flashing—pan, step, and counter flashing—along with understanding the right placement and proper installation techniques can make a significant difference in maintaining the integrity of your home. These flashing components work together to create a barrier against water intrusion, directing water away from your chimney and roof.
When you understand how each type of flashing functions and where it should be placed, you can ensure they work together to prevent leaks and moisture damage. Properly installed flashing not only enhances the overall durability of your roofing system but also provides you with peace of mind, knowing your home is protected from potential water damage.
Additionally, having this knowledge can help you recognize potential issues early on and take proactive measures to address them. By being informed, you can work more effectively with roofing professionals to make sure the flashing is correctly installed and maintained, which in turn helps extend the life of your chimney and roof.