Have you ever noticed water dripping from your bathroom fan or found a mysterious puddle on the floor? It's not only annoying but can also lead to bigger issues like mold and mildew. A functional bathroom fan is crucial for keeping your bathroom free of excess moisture, odors, and potential mold growth. It helps maintain a healthy and comfortable environment by venting out steam and humidity every time you take a shower or bath.
However, like any other home appliance, bathroom fans can run into problems. One of the most common issues homeowners face is leaks. You might be wondering why a bathroom fan leaks and what you can do about it. In this blog, we'll explore the typical reasons behind a leaky bathroom fan and provide some practical solutions to fix the issue and prevent it from happening again.
Here are some of the most common reasons why a bathroom fan leaks:
1. Incorrect Installation
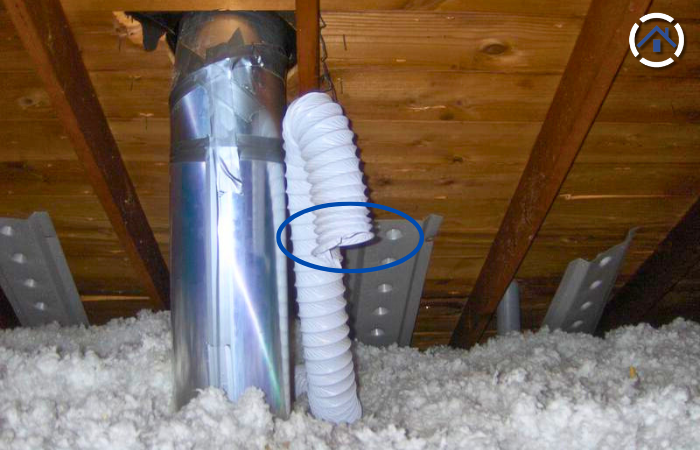
2. Flexible Duct Issues
3. Flexible Duct Not Connected to the Roof Cap at All
4. Damaged or Worn-Out Components
Here are the potential issues if your bathroom fan is leaking:
So, how should a bathroom fan be correctly installed to avoid these issues? Let's break it down step-by-step.
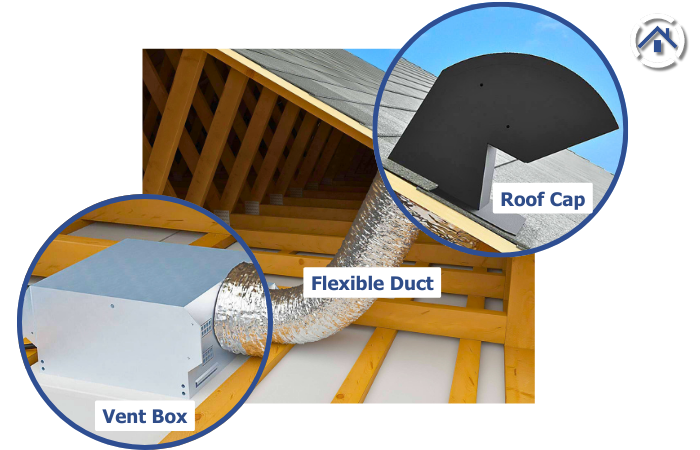
1. Secure the Fan Unit: First, the fan unit itself needs to be securely mounted to the ceiling joists. This ensures it stays in place and doesn’t create any unwanted gaps. Make sure it’s nailed and sealed properly. Think of this as the foundation—if it’s not solid, the whole system can fail.
2. Connect the Flexible Duct: Next, you need to connect the flexible duct or tube from the fan to the roof cap. This tube should fit snugly to avoid any air leaks. Use clamps or tape designed for ductwork to ensure a tight connection. Imagine connecting a garden hose—you want it tight enough that no water leaks out.
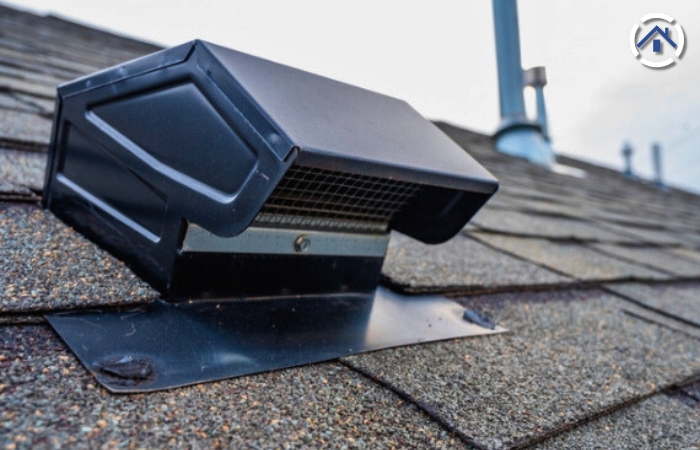
3. Install the Roof Cap: The roof cap is where the venting magic happens. Installing the roof cap correctly is crucial. It’s a bit like installing a chimney. Here’s the trick: the back and sides of the metal roof cap should go underneath the shingles. This helps create a watertight seal and ensures rainwater flows over the cap rather than seeping in. The front of the metal roof cap should be exposed and sit over the shingles, guiding water away from the opening. It’s like layering bricks for a sturdy wall—each piece has its place to keep everything secure.

4. Seal All Connections: After everything is in place, double-check all the connections. Seal any gaps with appropriate caulking or sealant. This ensures no moisture can sneak through, just like making sure all the windows in your house are tightly closed during a storm.
So now that we know why bathroom fans can leak and how to install them correctly, let’s talk about how to keep them running smoothly. A little regular maintenance and proper usage can go a long way in preventing leaks and other issues.
Regular maintenance is the key to a long-lasting, leak-free bathroom fan. Here are some easy tips to keep your fan in top shape:
1. Clean the Fan Cover: Over time, dust and grime can build up on the fan cover, reducing its efficiency. Every few months, remove the cover and give it a good clean with warm soapy water. Make sure it’s completely dry before putting it back.
2. Inspect the Fan and Ducts: At least once a year, take a look at the fan itself and the ducts. Check for any signs of wear and tear or loose connections. If you notice any issues, address them promptly. Tighten any loose screws and reseal any gaps.
3. Check the Roof Cap: While you're inspecting the fan, don't forget the roof cap. Ensure it's securely in place and free from debris. Clear away leaves, dirt, or any blockages that might prevent proper ventilation.
4. Listen for Unusual Noises: Pay attention to how your fan sounds. If it starts making unusual noises, it could be a sign that something is wrong. It might just need a good cleaning, or there could be an issue with the motor or the fan blades.
Using your bathroom fan properly can significantly reduce moisture build-up and prevent leaks. Here are some tips:
1. Run the Fan During and After Showers: Turn on the fan every time you take a shower or bath. Let it run for at least 15-20 minutes after you're done to ensure all the moisture is vented out. This helps prevent condensation and keeps your bathroom dry.
2. Keep the Bathroom Door Slightly Open: While the fan is running for at least 15-20 minutes, keep the bathroom door slightly open to allow fresh air to circulate. This helps the fan work more efficiently by pulling in dry air and pushing out moist air.
3. Use the Right Size Fan: Make sure your fan is the right size for your bathroom. If it’s too small, it won’t effectively remove moisture. If you’re unsure, consult with a professional to get the right fit.
4. Avoid Overloading the Fan: Your bathroom fan is designed to handle moisture from showers and baths, but avoid overloading it with other tasks. For example, don’t use it as a primary source of ventilation for other parts of the house.
Understanding why your bathroom fan might be leaking and knowing how to fix it can save you a lot of headaches. Proper installation and regular maintenance are key to keeping your bathroom fan in top condition. But let's face it—sometimes, things can get a bit tricky. If you're unsure about any part of the installation process or if you run into persistent issues, it's always a good idea to consult with an expert. So, don’t wait for that next mysterious puddle or drip from the ceiling. Take action today to keep your bathroom fan running smoothly.